Showing posts with label DIY. Show all posts

Monday, March 24, 2008

Button Up, It's Getting Springy Out There!

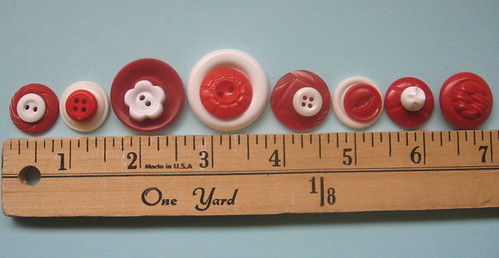
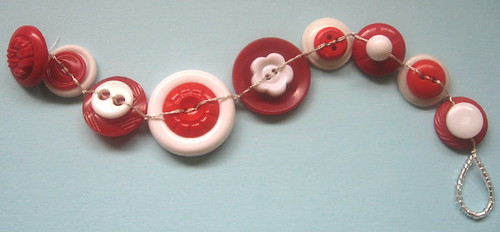
There were/are quite a few birthdays in my family this month. For my sister (in law) Maura, I decided to make her a button bracelet as she has wanted new jewelry and loves home made gifts. I decided to make another bracelet to sell in my etsy shop. I'm also making one of these and it will soon be up on my etsy shop too -


This bracelet is made from buttons I got in the infamous tin of buttons from my dad's mother, Grammy if you will. I felt this would connect Maura even more with our family and our history to make her feel more a part of us, in case she didn't already. She liked it a lot, I'm happy to report. So, if you want to get your very own, hurry to my etsy shop noooow! You too can own a little piece of the Adams' Family Legacy collection TODAY!


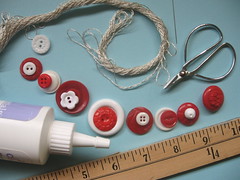
Kidding aside, these bracelets were fun and easy to make. Here are step-by-step directions for those of you brave enough to do this on your own, thanks to Creative Kismet.


What you need:

Embroidery Floss- (I used DMC® Metallic Embroidery Floss)
assorted buttons (any kind)
glue
scissors
ruler
2 -Light-medium twisted beading needles (you may not need these)I make my bracelets roughly 7-8 inches long. You may want to measure your favorite bracelet to get a better length for you.

1. Cut off a 1 yard piece of embroidery floss. Put a dab of glue on each end and twist each end to a point and allow to dry. This will give ou a semi-rigid “needle” for threading through the buttons. If this doesn’t work for you, you can use a beading needle to thread your buttons.

2. Arrange the buttons you will be using in a 7 inch line with small spaces(1/16) in between each button.

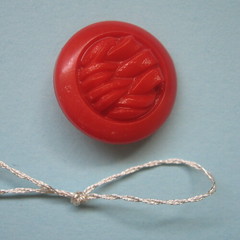
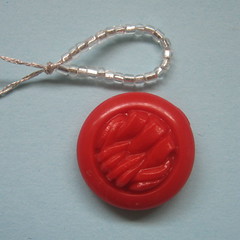
3. Take embroidery floss, fold in half, make a loop (big enough for last button to fit through) and tie a knot. You can add seed beads first to make latching on/off easier.

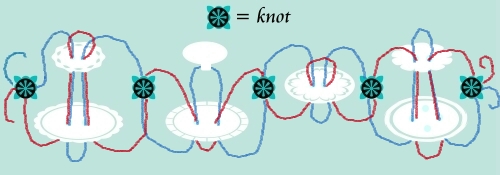
4. You will have two ends of the string in which you will weave in and out through the buttons in opposing directions. This keeps the button from twisting and flipping over. Use the following diagram.

5. Weave one button at time, knotting in between each button making sure to tug tightly on the thread, until you get to the last buttons.

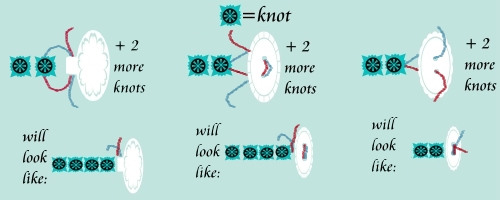
6. There are 3 options for finishing off the last button.

For option 1 and 2 you will be taking the thread through the button then finishing it off with two knots directly behind the button right next to the first two knots. For the third option, you will just take the thread through the button holes and do a double knot on top of the button. Trim the excess thread and add a dab of glue to keep knots together.

Monday, March 10, 2008

I Love Sushi - Take Two!

Making sushi can be pretty easy if you throw together seaweed, some rice that is semi-sticky, add some fish, some veggies, and viola – sushi. Eat it in the first 5 minutes and no one will even see it fall apart. If you want to make good sushi, it will take time and attention.

The most important piece to making good rolls = the R-I-C-E. It has to be juuuuust warm enough from the steamer but not toooooo hot, and soaked eeeeeextra long and the rice vinegar should be in an exact proportion to create a pH level of 4.6 or lower (v. simple – 4 parts rice, 1 part vinegar should roughly = 4.6 or lower). Not only does this pH level stop any bacteria from forming, but it completes the taste of the roll. We learned that many of the bits and pieces of sushi eating all play minor roles in killing bacteria! This should be something we can all accept without gagging or thoughts of disgust because this is raw fish and there should be implicit steps to assist people in eating this in a healthy manner. The wasabi added for that extra spicy kick, yup, that too.

Back to the rice. Before steaming the rice, let it soak in water for 30 minutes. Then use a rice cooker to steam the rice. Me, being all anti-kitchen-gadgetry and frugal, asked our chef if I could make it without a rice cooker. He said yes, but strongly encouraged a rice cooker. Only because if you burn it, there goes an hour of your time and all that wasted rice. He also mentioned cooking on a stove top usually cooks the rice unevenly (the middle being the best part, the rest not as good). Taking this into consideration, a rice cooker will soon be a part of our happy home.

The last tip I can remember is in prepping vegetables. Dry them off and wring out excess water before adding them to your roll set up. Too much water will make the rice lose its stickiness and also make the fish + veggies + rice a little too mushy. When you’ve finally wrung out your veggies, cooked and vinegar-d your rice, and picked out the freshest, sushi grade fish – it’s time to roll.

This was news to me – do not use a WHOLE sheet of Nori (seaweed), use half. On learning this, I remembered all those times my rolls fell apart and realized I’d been making them JUMBO! Using half means getting the interior ingredient ratio just right in order to roll it well. I am still working on perfecting this ratio after trying many times, so don’t feel discouraged if the first time doesn’t work out. A tip in the set-up process is to make a little indentation in the middle of the rice where the ingredients will go. This adds a little more room and holds them in the center better. Once you’ve got your roll all…rolled up use a clean, sharp knife to cut the roll into six pieces. The sharper and cleaner the knife, the easier cut and prettier roll you will get.

My beau and I have a favorite new sushi we took away from our course – the hand roll. Our sushi chef said this is what family would eat together, but not usually one served for parties - it is not pretty, or complicated, so no one would be impressed! But boy is it tasty! A hand roll is simply this – holding the nori on your palm, you put a dab of rice in the lower left corner of the seaweed, sort of spread in a triangular shape. On the opposite right upper corner, you put a little dot of rice, which will later seal your hand roll. Next, you pick about two ingredients, and add them to the top of the rice. This is the tricky part, but since this is a family roll, perfect appearance doesn’t matter – to roll it up, with your free hand take the upper left hand corner and fold it down to the bottom edge, creating another triangular section. Then roll this like your rolling a poster up, to create an ice cream cone shape. This is the simple, but tasty hand roll. We like it for the extra crunch!

Thursday, February 28, 2008

I Love Sushi!

Sushi is a fad I am whole heartedly embracing and one I also propagate financially and market-wise in introducing more people to sushi. Light, delicious and nutritious, sushi is a dream come true for pescatarians (vegetarians that also eat fish) and health conscious eaters. One can even go so far as to take their pocket fish eating guides with them to their favorite sushi bar to ask where and how the day's fish were procured, adding some sustainability efforts to the eating of sushi. Most importantly though, eating and enjoying sushi is about art. Sushi is beautiful. The color, the shape of the fish, the arrangement of the rolls and nigiri and sashimi on a plate are all pieces of 'ingredients' that lend to better tasting sushi.

My beau and I love sushi. We eat it at least once a week, maybe once every other week. We are fortunate to live near a semi-ok sushi bar, JP Seafood, conveniently located within walking distance of our apartment. On special occassions we've been known to shell out more cash to go to Fugaku, which has added atmosphere and ambiance over JP Seafood. One down side to our shared love affair with sushi - it is expensive! With all this in mind, when Christmas rolled around and simultaneously I received a Boston Center for Adult Education catalog, my prayers were answered on page 3 - I LOVE SUSHI, 101, two classes for $98 each (I know, expensive, but it was more money to save money later). Jason got a Christmas gift, we both got to eat sushi, AND save money by learning to make it. It helped that I had a credit with them too from a prior class I was unable to take.

We really enjoyed the classes. They were held at Boon Ko's distribution/sushi center located at the Fish Pier #4 at Sea to You. Boon is a fish seller and sushi chef, but only for corporate, personal, or catered events since he has grown in popularity and demand. He has a sense of humor so made the class fun with his jokes and constant smiling face. The class started with about 15 people and ended with about 6. Perhaps the cold got to them, as one of Boon's work place heaters broke. But it was cold in general to better store the day's catch. Or maybe it was how he was over 45 minutes late to start the first class and left us outside kicking and banging on the door. And then dismissed class about an hour early. Over all, these were not serious deterrents to my beau and I as Boon gave us some pointers in the first five minutes he talked.

For you my dear readers, the $98 class fee is waived, and you will be inducted into the depths of sushi knowledge I have gained in a two part blog session. The sessions will be backward though, in that we will discuss cuts of fish and best practices and finding good restaurants BEFORE personal prep as I only have Session #2's notes with me now.


*aside - the sushi to the left was made by my beau, look at those rolls, perfect!*

To find out if your favorite sushi bar chef is indeed a REAL sushi chef, try asking the following questions -

1. What fish is good today? <-- KEY! 2. What are the three types of Tuna? (toro = fat, chu toro = fatter, and otoro = the fattest and they all come from the belly) 3. Try bringing a fresh caught fish and asking them to prepare it for you. A real sushi chef would. 4. Why does the nori (seaweed) have lines on it? The lines are from the drying process. Boon supplies most Boston and metro Boston area restaurants with their orders, so when another student asked the $1,000,000 where to eat question, we all leaned forward in anticipation. First, he answered graciously with a general way to tell what restaurants would have better sushi - those who's manager or boss came down to his shop THEMSELVES to pick out the fish instead of having it delivered. His main point stressed over and over again was that a good sushi chef is nothing if he does not have GREAT ingredients. Boon went on though to specify that Fugaku's manager does NOT come to get the fish, though because they order a lot and are popular, they can be picky and send fish back. Jason and I had heard of a small place in Chestnut Hill called Oishi, (or is it this Oishi in South Boston...damn it! I guess we'll have to try both) and supposedly their sushi trumped Fugaku. Boon only confirmed this when he told us Oishi's manager DOES come to get the fish. Next stop, Oishi. It is small and kind of out of the way to get to, but now we are convinced it is worth it to go.

Buying and making your own sushi is more cost efficient; it reduces the cost by almost 90%, as the fish cost makes up only %10 of a sushi tray price. Most of the cost is in the labor - making sushi is no easy, quick matter if done properly. Buying a pack of 20 veined, cooked, and tail-less shrimp is $20, about $.50 cents per shrimp! A good slab of white tuna should be about $15/lb where as the more desired and tastier Toro tuna costs $40/lb. These may sound expensive, but when you can get about 20 - 100 rolls out of each fish, do the math? The prices work out to be less than a $1 per piece! Even for nigiri sushi or sashimi, which are not Maki (rolls), but are the slabs of fish with rice (nigiri sushi) or without (sashimi). Jason and I have just recently moved on from our obsession with rolls on to nigiri sushi. Something about the texture and bite of a fresh piece of fish quenches a primal taste within me. My first experience with nigiri I did not think as much, so I've definitely evolved my sushi tastes in the last 5 years.

One last surprising piece of information was learned from a guest speaker visiting the class. His name is Walter and he teaches at BU...I think and lives in Hawaii most of the time. He focuses on the science side of food and sushi making. He told us that Sake and beer do NOT compliment sushi, they actually take away from experiencing the full flavors. He said if you see what a sushi chef is drinking, a real sushi chef drinks TEA. Tea and ginger do something to enhance the breaking up of complex proteins into amino acids, which are easier for the tongue to taste. And also - CHEW! Chew a piece of sushi as long as you can because the more you do, the more all the ingredients interact and more and varied tastes are released throughout the process. American sushi is far larger than Japanese sushi, so the Japanese style of all or nothing is not fitting for American sushi.


All right, my teaching is done for the day. Do join us again tomorrow, same time same place for Session #1 on secret tricks in the actual process of MAKING your own sushi. Stay tuned...but in the mean time, through my searches for this post I found a very helpful and informative Sushi Site. I also found this article from the NY Times which I am REALLY REALLY not sure I agree with at all and only confirms that what Walter said is true, Japan is still a MALE DOMINATED society. Otherwise, enjoy today! Get some sushi!

Thursday, February 7, 2008

New Items - At LAST!

Just a heads up to people who were interested in my hand made paper - there is some posted in my etsy shop. (the address to my shop is in the 'Etsy' section in the left hand column) Check out the Go Green Paper, I am really really proud of that paper.

I'm even more honored to announce that I possibly have my first commissioned job as well. A friend of mine is getting married in the fall and asked me to make the backings for her invitations. I sent her some samples so we'll see if my paper is what she had in mind.

I never knew how intricate one could get in choosing what goes into each batch of future paper. For the Go Green, if you read the materials used list, you'll see I shredded a pair of jeans I've had the leg of since the late 90's. I remember wearing those jeans with this clashing teal green and white plaid flannel of my dad's to high school. I thought I was so cool. I probably had my "totem rocks" tied to my waist band too. I'll post about those another time though when I can include pictures of them. Suffice it to say I was a very alternatively spiritual teenager for my time and very very unpopular.

Anyway! Paper and the paper making process has got me thinking in creative ways I have missed. Trying to think of the right combination of colors for the shade I want, getting the right size chunks for pieces I want to disintegrate and for those I want to leave as chunks - I didn't know there was an infinite universe of choices in making this paper. I found some great ideas for different textures and different chunks I could use from these sights the above soon-to-be-married friend sent me -

www.custompaper.com
http://botanicalpaperworks.com/
http://plantamemory.com/plantables.html

The next type of paper I want to attempt making (besides some home made pinkish red paper for a home made valentine for my beau) is seed paper. What a great idea to be able to plant the ENTIRE invitation or piece of paper and get some herb or plant from it. I've heard from a friend who got a Cilantro invitation like this that the paper is tougher to print on, but that could easily be solved for special occasions by printing on vellum and attaching that to the top of the home made paper. There is a lot I want to try...so much creative possibilities...

Enjoy!

Tuesday, January 29, 2008

Etsy Band Wagon

There is now an ExtraOrdinary etsy shop! If you look to the left hand column, you will see it featured right below the bloggers I read and right above the other etsy shops I browse.

Right now there are limited items for sale, but stock will increase and vary from hand made paper (which can be invitations, thank you cards, business cards, etc…) to cross stitch patterns to wine charms and other wire arts. If anyone purchases something from the store and mentions finding the store through my blog, I'll add an extra free gift to your purchase.

Feel free to send comments or suggestions.

First new item I will be posting later today is how to make this bitchin’ craft sign. This is for all you knitters and cross stitchers out there sick of cliché sayings and cutesy flowery borders.FYI - the frame AND mat only cost me $10 from a second hand store. The frame was home to some hideous water color of an Old Englishe towne, but my sign looks so much better there. The puce green color was the cincher for me - perfect old lady color to add to the funky-ness of this sign. There are other ideas for patterns you can buy or submit at Subversive Cross Stitch (SC). They’ve even made life pretty simple for us crafters by providing this free online program that will convert any picture into a pattern…FREE! Very useful when turning a famous print into a cross stitch project, (I created my pattern myself though, no knit pro for me) but not so useful if you want to sell something. I believe you can only sell your original ideas, but I’d have to find a copyright lawyer to verify that for me. Knit Pro 2.0 is going make needle pointers like me who make their own patterns obsolete. Or to see the glass half full – more efficient! However, the program is limited to whatever font options they've entered. If you've ever seen a cross stitch sampler book, you'd know there are TONS of alphabets to choose from, so why limit yourself? For this sign I created my own alaphabet, so it is more original.

Keep On Stitchin' On! © Erikka's creations


just in - found one other site online that makes knitting patterns too called Pixel Blocks

Wednesday, January 23, 2008

Shed those winter blues...

For a while looking into my dresser drawers or in my closet I felt like I owned way too many clothes.Skirts were bunched 5 onto one hanger, dress pants were squeezed 3 to a hanger, and there were so many hangers,


there was no room to slide any clothes one way or the other. Downsizing from my old storage space to our new apartment had already led me to go through my clothes twice, each time giving away at least two big bags to Boomerangs. Looking into Jason's closet where it seemed each hanger was evenly spaced out from the last, my conscience was cringing.

I found the answer in the most unexpected of places - the style and fashion section of a newspaper. My problem was not that I had too many clothes. My problem was that all of my clothes were hanging or folded in the every day wear area. Summer clothes mixed with winter clothes is the first stress inducer a person can easily fix. Outside the temperature is in the single digits, so there is a no need to have a skirt like this hanging about to tease me and remind me of warmer days and bear legs. And let's be honest - a woman seeing her unwearable, sexy clothes day after day while she is forced to don a thick turtle neck sweater and wool pants, eats away at the new outlook one must have in the winter. Let us make it easier and happier to get up in the morning and approach our clothes - take out all those skimpy, thin summer fabrics and put them away in storage until it is really time to wear them!


Not all tank tops and thin shirts need be stored away if they can be layered with other pieces from your wardrobe. Pieces like that are versatile should be 75% of your wardrobe...but if you're like me, they make up about 30%. I learned slowly that a more expensive, versatile piece of clothing is worth more money compared to cheaper, one season clothing that needs to be replaced more often. Also something I know but don't always do is about cleaning. The more expensive pieces will last longer if they are dry cleaned or not washed as often. The next time you think about tossing a nice pair of dress slacks in to the wash, start a dry cleaning pile instead!

Once you've decided which clothes are not staying out, gather them together and designate some big tupperware bin or other storage box in which they can be tucked and then hidden out of sight. For me I am a sucker for vintage items (and free ones at that). Thus I have been lugging around this old steamer trunk I found on the sidewalk near a friends' house last summer. The trunk is good for storing sweaters and summer clothes, though it has always posed a bit of a problem when it comes to the "hiding it out of sight" part. For the past 6 months it has been a quasi-table in the living room, one more surface to collect random clutter. Today I decided to solve two problems at once by cleaning out the closet, storing the clothes in the trunk, and stowing the trunk under our bed.

With the amount of summer clothing I was cramming into this trunk, I was thankful when the lid squeezed shut. After some rearranging of other junk stored under the bed, I got the trunk under there, only having to move one item to a new location. Heading back to the closet, I felt a palpable relief and could already see the difference. Hangers were moving from side to side and there were extra empty ones, too. Opening the dresser, there was room for all of my sweaters in ONE DRAWER and room for all the layering tops in the another drawer AND the drawers were not completely full either. So much for having too many clothes!

Having this extra space allowed for me to focus on the quality winter fabrics and items I'd forgotten, seeing as they were buried beneath tiny, lacy tank tops or silky, see through skirts.


Winter wools may not be sexy, but they are durable, warm and have a timeless, practical appeal. The uniformity of seeing these fabrics paired with my sweaters, turtlenecks and sensible flats and boots, I feel less "un-sexy" and more stylish. My closet is organized with one skirt or pair of dress pants per hanger, there's room to add or take away, and I no longer have to throw out every item I own from my dresser to find what I want to wear for the day.

Tuesday, January 22, 2008

Oh the things you can do

I've finally completed two of the three gifts I am sending to the people who responded to my post of a few weeks ago. They were hand made, so it took me some time before I set aside time to work on them.

First, the lucky ladies who are getting these gifts are -

Christy at Farm Dreams
Gruppie over at Gruppie Girl
and Kathleen of Is She Serious? (which is now defunct, but was not at the time...)

And now to announce the two (of three) gifts. Normally sharing gift ideas is not common and seems a bit cheap...it still does really, but I am happy and proud of myself for accomplishing these two tasks. I am rewarding myself with an internet tap on the back. And none of the women will have her surprise spoiled as none know which they will get (but if they weigh in their preference in the comments before 3 today...I might be swayed :) ). The first gift is a set of four wine tassles -

The ones above are to be given away and then there were also these to the left that I made for J and I and our extensive wine glass collection. These are really fun and easy to make, so I might bust out a few more sets to sell in my soon to be etsy shop. Keep your eyes peeled for the announcement of that new project.

The second prize is a bit rougher around the edges, quite literally, as this is my first attempt at paper making. Sunday turned out to be most unproductive for me - I missed church, only had time to cross stitch a smidge and play Super Mario Galaxy before heading out to watch the Pats game. Fortunately I was reminded of the splendidness that is the US Government for giving the day off in recognition of MLK as the super hero he was. MLK day turned into the craft day I had wanted and needed. Mind you I've been slightly sick and impaired through all of this, but not enough to incapacitate me. Here are the first glimpses of my paper making -


The paper was still wet during the photo shoot. Now that it is completely dry, it is a light shade of lilac with shiney flecks of fuschia, bits of brown for texture and meat, and flecks of white for fun. The complete gift is the paper with home made envelopes, which people will also see more of on my soon to be etsy shop. Stay tuned...

As for paper making and the process itself, it is easier than I thought. There were step by step picture instructions I found most handy here. God bless this woman, B-zedan, for her unselfish sharing of her talent and time. The process took about an hour, in which time I made 4 sheets of paper. One problem I encountered was my vat bowing in the middle. In order to make a sheet of paper, the surface of the vat should be flat as should the screen to be inserted in the vat. Both were warped in my case. The sheets did come out flat after all, but I feel I cheated when I used my hands to smush around clumps of paper to more ideal places on the screen. Plus, I had to add a step of not just shaking the screen as I lifted it out of the vat, but shaking it while it was IN the vat in order to attempt even distribution of the paper pulp. I went so far as to shake the vat itself while holding down the edges of my screen in the pulp and this sort of worked while there was a lot of pulp left. Once the pulp thinned, it got harder for me to make paper. What's really interesting to me is that the fattest piece of paper I made turned out to be normal thickness when it dried. The others that I thought looked like normal thickness are thinner and more delicate now.

Saturday, January 19, 2008

Window Treatments


When I first heard the term "window treatment" I remember wondering what was I treating my windows to...a cleaning? A special chemical that enhanced their clean shininess? Then my brother used the term in reference to making CURTAINS for he and his wife's new apartment and relief washed over me, followed by exasperation. Why not just say CURTAINS? Why do we as people have to continually try to come up with new words to make ourselves sound more cultured and sophisticated? I don't have to sound haute couture, so I say CURTAINS.

This week-end I completed three pairs of curtains for our apartments living room. These are the most simple and easy to make curtains ever; the sewing impaired could use these DIY instructions and make curtains.

I have quite a few projects in the works right now and planned to work on all of them today. Though I only worked on the curtains and hemmed a pair of pants, at least I can say I am now DONE the curtains and can concentrate on the other projects - a sign for Jason's sister Angela for when she does craft shows (see her etsy shop at DyedSpinning), paper making, and the same bird and tree cross stitch project I mentioned last month. Having two days off seemed a wonderful gift at some point in life, but it's just not enough time for me to accomplish everything, to see everyone I want to see, or to go everywhere I want to go. Sigh. I guess that is what is truly meant about prioritizing - making the most of every minute so when you don't get to some things, those things are the least important and you don't feel bad about not getting to them.

Jason and I did manage to squeeze in going to Cafe D located blocks away from home on Centre Street in lovely downtown JP. I highly recommend it for its romantic and funky atmosphere and its tasty, higher priced food. I got the prix fixe selection which guaranteed three courses for $27, not a bad deal. I got a Boston Bibb salad (B, but I'm a salad snob. To get an A a salad would have to have at least 5 other ingredients besides lettuce), the Penne pasta (A, yummy pesto with mushrooms ), and chocolate mousse for dessert (A+). All this was also accompanied by two glasses of Sauvignon Blanc and a Tawny Port (both get an A) with my dessert. Jason had this deelish duck with celeriac prepared three ways and some lentils. He gave me a piece of crispy, golden duck skin, fat still clinging to its underside...and I have to admit it...it was a little orgasm in my mouth. Over all experience: A.

On to tomorrow where there is church, football, and possibly paper making in store...

Tuesday, December 4, 2007

Where is my mind?

My mind is on this -


All I want to be doing right now is as follows - at home with a cup of tea beside me, a movie on low volume on the television, and my cross stitch project to work on. The project is taking the above Charly Harper Print and creating a cross stitch version for our living room. I want all of Charly Harper's art in some form in my apartment. I wonder if I am infringing on his copyrights if I am reproducing his art work...probably not since I'm not selling it.

My mind is also on a holiday gift for Jason's sister, Angela. She spins her own wool and dyes it too. She has started her own little business over at an etsy shop called Dyed Spinning. And, sh, as a secret, Jason bought her her own URL for a website! BUT! I am looking to make her some "subversive cross stitch" type knit signs for when she does art shows and craft fairs. Her signs will read -

KNIT HAPPENS.

You ain't shit, if you don't knit.

And other such charming phrases. Thank goodness for the holiday season and gift giving because this year, it has opened up the flood gates to my creativity and I am FULL of ideas.

Let the creating begin!

Monday, December 3, 2007

'Tis the Season

At first I thought I'd put up my revised Christmas list to kick off the December month of blogging (who cares that it is the 3rd already). Just a few short posts ago, I'd only wanted four things. Over Thanksgiving, my family chose names for secret santa. Combine this with listening to Jason's wish list to his family for their secret santa and suddenly my list grew from 4 unattainable wishes to 9 wishes, some attainable, some not. It dawned on me how lame a post that would be before I did it (phew). Who cares what I want for Christmas? And though my list may help others who find themselves at a block in what they may want themselves, I just don't have the heart to be a catalyst for consumerism this Christmas (beat that alliteration, FC). If you celebrate Christmas, it is not (only) about wanting and gifts. And any way in which I can remind myself of this during the next month, I'm going to take it.


On Saturday, Jason and I went on a drive to Concord MA to look for a Christmas tree. We decided to get a living tree, so we could plant it later and be replenishing the tree supply instead of diminishing it. And more than just that hippy BS, the tree will last longer than a cut tree. We could have this tree in our house until Christmas '08. True dat. To decorate our apartment and the tree, we made everything, including a cheesy string of popcorn we used as a garland on our mini tree. I had a string of lights we put around the living room, and we made paper cranes as ornaments for the tree. We even did the old school construction paper chain link to drape atop a door frame. Jason also created a very avant garde piece of holiday art with some pine boughs and bittersweet (as seen above). All in all, this holiday...day was a full day event. So not only did we get in the spirit (and not THAT kind of spirit, geesh) but we spent time together. We listened to Christmas music, shared some stories about our family traditions, and just had a silly time.

Another thing I like to do to flout the Buy Everything New mentality of the Christmas season is to not buy
wrapping paper. I use old newspapers to wrap most gifts. Some people might think this looks trashy, but to set off the some what dull nature of newspaper, I usually create a neat bow or center piece for the top out of things I find outside (ie pine cones, bittersweet, and sometimes neat trinkets I pick up). Sometimes I attempt reusing already used gift wrap if it is not too wrinkly. People can still tear the paper off gifts excitedly because bigger or smaller pieces can be used according to the next gifts size. I just read from Gruppie Girl's blog that if everyone used some sort of recycled material for only 3 gifts it would save enough paper to cover 45,000 football fields. Wow. Try to picture that again - 45,000 football fields...Her idea of using cloth gift bags is probably easier to accept than my newspaper one.

Choosing a secret santa method for exchanging family/friend gifts is also a money saver AND a hippy idea. Fewer gifts are bought, more thought is put into that one gift (hopefully) and the focus is less on the present, leaving more time for...other holiday traditions like eating. And eating. And eating some more. Again, my family is not huge on straying from the eat, movie, game strategy for holidays, Christmas no exception. On Christmas Eve we gather with my mother's side of the family (the not estranged ones and sometimes some of them show up and EVERYONE feels the uncomfortable-ness) to eat and do a Yankee Swap. Christmas Day my immediate family (parents, brothers, me) have a big breakfast and open gifts together. This has changed slightly now that my brothers' have wives. They now usually spend Christmas Eve with us and Christmas Day with their other family.

During Thanksgiving when I heard my first Christmas music, I began to dread and loathe the holiday spirit and season. But I don't want to be a grinch! I LOVE celebrating and decorating and honoring traditions. Before turning green and getting my face frozen in an evil grin and stealing other people's presents, I decided I had to see my own values in this holiday. To RECLAIM Christmas for myself so I could be joyful and present in this special time of year. Because really, we're talking about more than buying stuff and decor here - it's about the birth of Jesus. I am not a Bible wielding Christian right wing conservative. However, I like to believe there was a man named Jesus who did great things. Perhaps he did not walk on water or change one loaf of bread into twenty, but I think he did tremendous things that appeared as miracles to the eyes of people who were starved for something to believe in. He seems like an exemplary human being, one we could all strive to be a little more like. I was reminded of this aspect of Christmas when Jason came in to put the little wooden cross you can see on the tree. He said, "We can't forget to have a little bit of Jesus for the tree too." Spoken like a true wise man.

So bring on the holiday lovin'. I decided to include a soundtrack to my holiday season in case people are getting sick of hearing the same old Christmas music over and over again because seriously, I can't listen to Deck the Halls in 10 different versions for the next 31 days. I don't know about you.

All I Want For Christmas Is You - Mariah Carey
O Come O Come Emmanuel - Sufjan Stevens (and ALL of his Christmas music. get past the "depressing" bits - IT'S WORTH IT!)
Deck the Halls - John Denver and the Muppets
The Christmas Song - Mel Torme
Carol of the Bells - Barenaked Ladies (no words)
God Rest Ye Merry Gentlemen - Barenaked Ladies
Sleigh Ride - Barenaked Ladies
The Holly and the Ivy - Mediaeval Baebes
Christmas in Hollis - Run DMC
The Little Drum Machine - Beck
Frosty the Snowman - Fiona Apple
Holy Holy Holy - Sufjan Stevens


Ho ho ho, Merry Christmas!